Overview
The Settings menu provides access to every configurable aspect of the client such as connection settings, position switching, sector assignment, restricted area configuration, input devices and various global settings that affect both processing and display of data.
Connection
The connection menu item opens the Connection Window. From here you can connect to VATSIM.
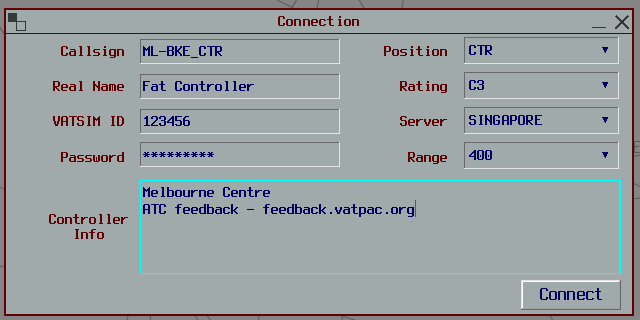
Callsign, Position, Range and Controller Info are loaded from your selected Position
Choosing a VATSIM position (CTR, FSS, etc.) will update the Range options available and automatically select the second highest value. You can return to the Connection Window at any time to update Range and Controller Info.
Position
The position menu item allows you to select from a pre-defined list of control positions contained with the profile loaded by vatSys.
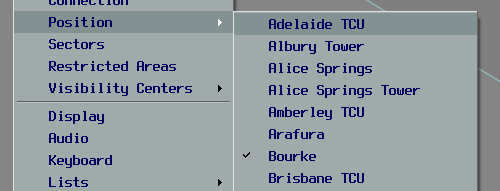
Selecting a position from this list will adjust the display centre of the main Air Situation Display, load Maps, and open Windows appropriate to that position.
If you are currently offline, selection of a position will also update Connection Window fields and select the correct Sectors.
Sectors
The sectors menu item opens the Sector Configuration Window, which allows you to choose which volumes of airspace you are responsible for.
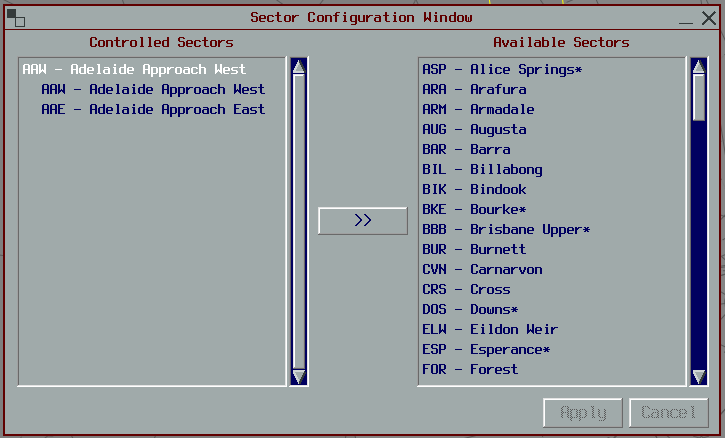
Sectors must be selected to ensure that vatSys presents information relevant to your control position. Such information includes the track states (colours), strip postings (which strips appear) and the application of appropriate safety net alerts (Conflicting alerting, etc.).
Sectors should always be chosen, even if they don’t correspond directly to your control position. For example, a Tower without it’s own airspace should choose the Approach airspace to ensure strips and colours are available.
Airspace Volumes
Airspace is divided into three dimensional volumes and then those volumes are assigned to Sectors.
Sectors may be defined as parents of other sectors. Parent sectors allows easier selection of grouped airspace.
Selecting Sectors
Sectors may be moved between Available Sectors and Controlled Sectors by first selecting the sector and then using the arrow button to swap sides.
Parent sectors are indicated by the * character following the sector name. Selecting one of these sectors will expand to show the children sectors also being selected.
Controlled Sectors will update automatically in two situations:
- When a new Position is selected while offline
- When another controller who is the defined owner of that airspace connects
Restricted Areas
The restricted areas menu opens the Restricted Area Setup Window, which allows you to configure the activation and display of defined restricted and danger airspace.
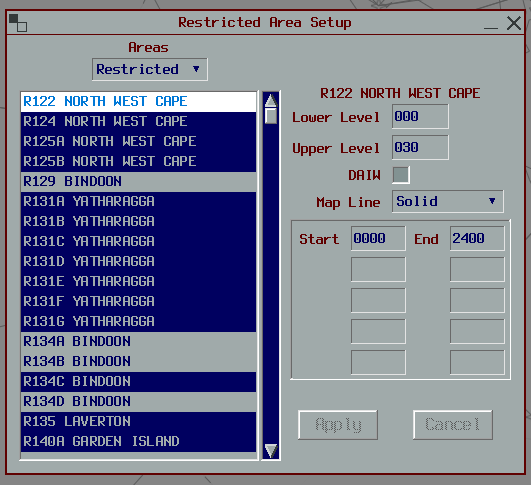
Areas may be filtered by type using the top drop down menu. Areas that are currently active are shown in inverse colour. Select an area from the list box to modify its parameters.
| Parameter | Function |
|---|---|
| Lower Level | The vertical boundary (lower) in hundreds of feet. Used for alert processing. |
| Upper Level | The vertical boundary (upper) in hundreds of feet. Used for alert processing. |
| DAIW | Checkbox to enable / disable alert processing. |
| Map Line | The appearance of the restricted area map line when area is active. |
| Activation Times | Multiple lines for entry of Start and End times. Area is considered active if the current time is between any pair of Start and End times. End time may be set to 2400 to indicate H24 activity. If a visible map line is selected, the map will appear 15 minutes prior to Start time. |
Visibility Centers
The visibility centers menu allows you to switch between automatic visibility center point selection and manual visibility point selection.
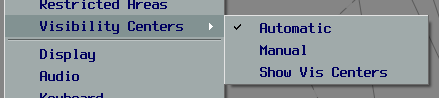
Automatic visibility center points are choosen to cover as much of your display range as possible for the choosen range value in Connection settings. Visibility points are updated every time you Store a new display center. You can view the current points by selecting the Show Vis Centers menu item (also available in Tools).
Selecting Manual visibility center point selection opens the Visibility Centers dialog window.
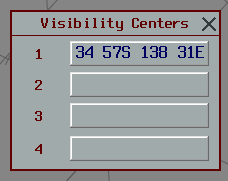
From this window you can manipulate the 4 available visibility center points.
LEFT or RIGHT CLICK - Allows you to graphically set the choosen points location on the main display
MIDDLE CLICK - Clears the choosen point
Selection of a manual visibility point disables Automatic visibility center logic.
Display
The display menu item opens the Display Settings Window, which allows you to configure Air and Ground situation display properties.
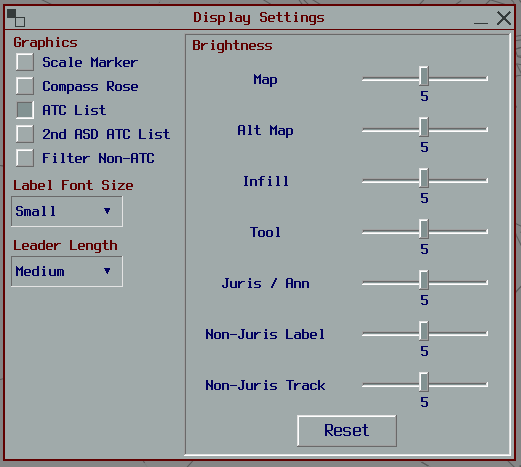
| Graphics | |
|---|---|
| Scale Marker | Toggles display of the range scale marker (shows 6NM by 10NM) |
| Compass Rose | Toggles display of compass headings |
| ATC List | Toggles display of online ATC List |
| 2nd ASD ATC List | Toggles display of online ATC List on popup Air and Ground Situation display windows |
| Filter Non-ATC | Toggles filtering non-ATC positions from all online ATC Lists |
Label Font Size
Adjusts the size of font used for aircraft and map labels.
Leader Length
Adjusts the default length of the leader line linking aircraft labels and tracks.
Brightness
Adjusts the brightness of various map and track colours on a sliding scale.
Audio
The audio menu item opens the Audio Settings Window, which allows you to configure audio device selection and volumes.
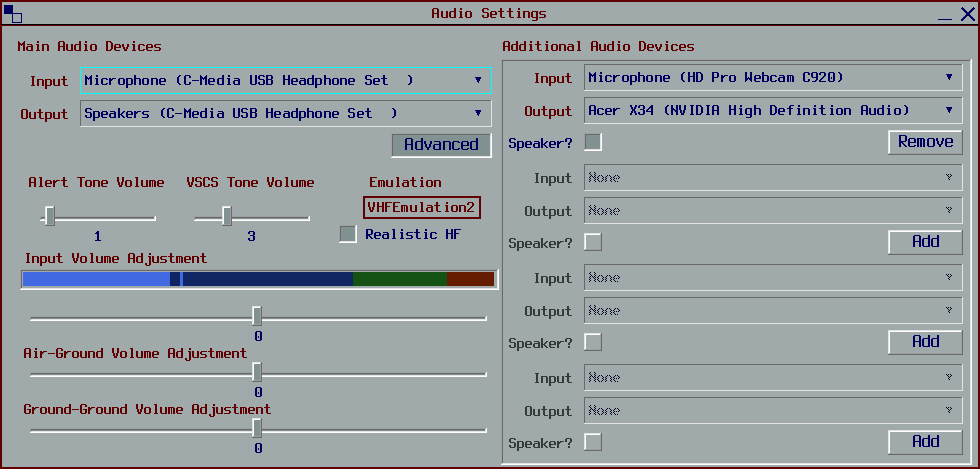
Select devices from the drop down menus. Whenever choosing a different microphone device, you should adjust the Input Volume Adjustment such that normal speech registers in the green section.
Air-Ground and Ground-Ground Volume Adjustments alter the output volumes.
Alert Tone Volume adjusts the volume of aircraft and system alerts. VSCS Tone Volume adjusts the volume of VSCS alerts, such as hotline and coldline chimes. Selection of 0 on either slider disables the respective tones.
Emulation options show the currently set VHF Emulation preset as defined for the loaded profile, and a togglable option to enable or disable realistic HF emulation (HF Squelch) that is enabled when not connected to the network.
Advanced toggles the display of an expanded panel to configure multiple input and output devices. Configure up to 4 additional inputs and outputs, which are mixed with the selected Main Input and Output devices. Toggle Speaker? for vatSys to treat the output as a Speaker device (responds to speaker buttons on VSCS).
Note: The Adding or Removing Additional Audio Devices and toggling Realistic HF emulation can only be done when not connected to VATSIM
Keyboard
The keyboard menu item opens the Keyboard Settings Window, which allows you to configure shortcut keys for various actions.
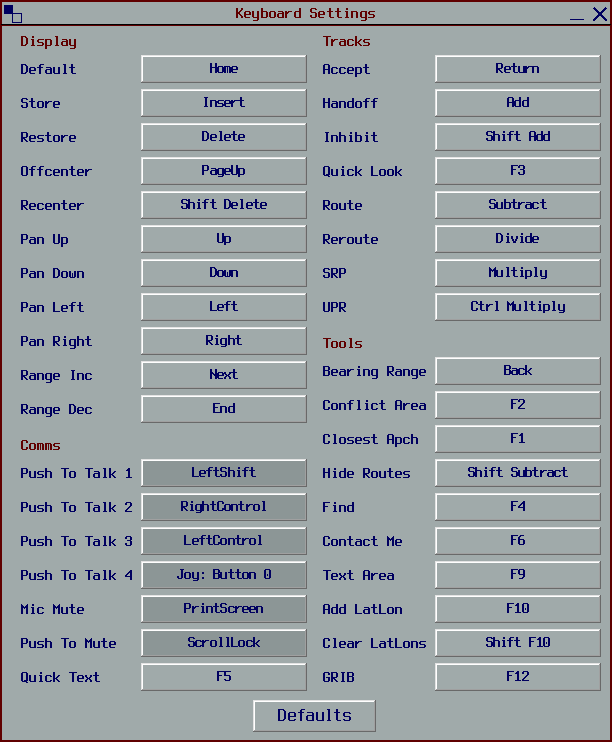
Key Settings
| Display | Action |
|---|---|
| Default | Resets the display to the center and range defaults defined for the selected position |
| Store | Stores the current display center and range for easy restoration |
| Restore | Restores previously stored display center and range |
| Offcenter | Shifts the display center to the current cursor location |
| Recenter | Resets the display center to the previously stored center location |
| Pan Up | Shifts the display north |
| Pan Down | Shifts the display south |
| Pan Left | Shifts the display west |
| Pan Right | Shifts the display east |
| Range Inc | Increase display range by 10% |
| Range Dec | Decreases display range by 10% |
| Comms | Action |
|---|---|
| Push To Talk 1 | VSCS Push To Talk (Joystick or Mouse Button, or Key) |
| Push To Talk 2 | Alternative VSCS Push To Talk (Joystick or Mouse Button, or Key) |
| Push To Talk 3 | Alternative VSCS Push To Talk (Joystick or Mouse Button, or Key) |
| Push To Talk 4 | Alternative VSCS Push To Talk (Joystick or Mouse Button, or Key) |
| Mic Mute | VSCS Toggle Coordination Input Mute (Joystick or Mouse Button, or Key) |
| Push To Mute | VSCS Push To Mute Coordination Input (Joystick or Mouse Button, or Key) |
| Quick Text | Switches VSCS page to Text |
| Tracks | Action |
|---|---|
| Accept | Accepts the selected track |
| Handoff | Opens the Handoff Window for the selected track |
| Inhibit | Inhibits the selected track |
| Quick Look | Quick Looks the selected track |
| Route | Toggles display of the graphical route for the selected track |
| Reroute | Initiates graphical reroute of selected track |
| SRP | Toggles display of the Short Route Probe for the selected track, or globally if no track selected |
| UPR | Repositions selected Flight Plan Track to the cursor position along the flight plan route |
| Tools | Action |
|---|---|
| Bearing Range | Creates a new Bearing and Range Line |
| Conflict Area | Initiates the Conflict Area Tool for the selected track |
| Closest Apch | Initiates the Closest Approach Tool for the selected track |
| Hide Routes | Hides all displayed graphical routes |
| Find | Opens the Find menu |
| Contact Me | Opens the Contact Me menu for the selected track |
| Text Area | Creates a new text area at the current cursor location |
| Add LatLon | Displays the latitude and longitude at the current cursor location |
| Clear LatLons | Hides all displayed LatLon points |
| GRIB | Opens the GRIB Window at the current cursor location |
Lists
The lists menu item allows you to configure List Window options, such as the arrival lists.

Hide Unknown Flights - when toggled, aircraft outside of your visibility range are not shown above the bar in List Windows.
Strips
The strips menu item allows you to open the Strip Setup Window and restore hidden strips.

Strip Setup Window

The Strip Setup Window allows for the configuration of all Strip Windows.
| Strip Sort Mode | |
|---|---|
| Alpha | Alphanumeric sort of callsigns |
| Time | Time sort based on sector entry time or departure time if departing within sector |
| Level | Level sort based on Cleared Flight Level |
| Strip Window Mode | |
|---|---|
| State | Strip Windows are organised by current Track State (Preactive, Announced, etc.) |
| Beacon | Strip Windows are organised by defined beacons, waypoints or airports. Flights of at least Preactive state with the defined beacon point in their route will appear in the window, or if none of the points are contained, appear in a generic OTHER Strip Window. |
Strip Windows may be opened or closed from this Window.
Beacon points may be defined by toggling one of the Define ... buttons and selecting one of the 5 available POINT slots. Type the name of the point and press Enter to complete.
The Reset button resets all parameters to those defined for the currently selected Position.
Restore Hidden Strips
Selecting this menu item will restore any strips that were manually hidden to the strip windows.
GRIB Winds
The GRIB winds menu item allows toggling the application of the GRIB forecast in trajectory calculations.

Disable Globally - when toggled, disables the use of GRIB forecast winds and temperatures when calculating the flight plan trajectories of all aircraft.
Navigraph
The Navigraph menu item allows linking of a Navigraph account within vatSys for up to date global navigation data.

Link Navigraph Account / Unlink Navigraph Account - this menu item will open your web browser to either sign in or out of your Navigraph account. Check for Updates - Must have a linked account. Checks Navigraph servers for updates to the currently installed global navigation data. vatSys will automatically check for updates on launch.
Check For Updates
The check for updates menu item checks the vatSys server for Application updates. vatSys automatically checks for updates on launch.
Change Profile
The change profile menu item allows the switching to another vatSys profile by closing vatSys and opening the Select a Profile Window.
Note: Holding the SHIFT key when opening vatSys will also bring up the Select a Profile Window.
Select a Profile
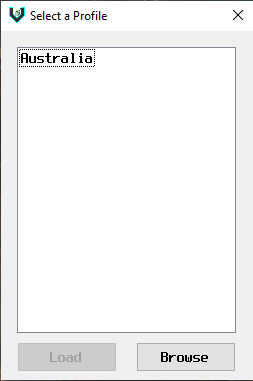
vatSys Profiles contained within Documents\vatSys Files\Profiles will be listed for selection. You may browse to other profile locations using the Browse button.